DJI M400 vs M300/350 vs M600Pro
The DJI Matrice 400 (M400) was launched a few days ago on 10 June 2025 worldwide!
In this article, instead of discussing its general specs and features which are already available over the net:
To check for basic specs/ features of the M400, please check here.
When DJI released the M400, it wasn’t just about replacing the M300/600s, it was a rethink of what an enterprise drone could do. Everyone is discussing its capabilities compared to the M300/350 and M600, let’s see the differences and check out which suits you more!
We will cover different aspects including the flight performance, battery systems and implications, the payload capability and also real-world operational impacts! We will delve into specific technical comparisons, use cases, and real-life figures between the M400 and the comparable models.
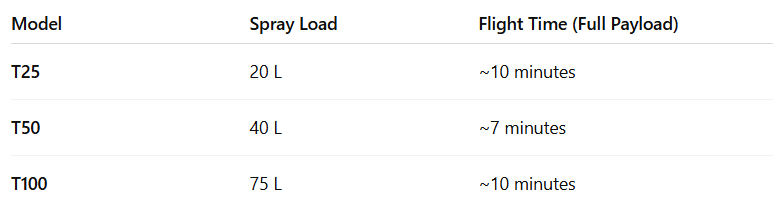
Flight Time and Speed: Do More in a Single Launch
Endurance is everything when we are covering a paddock, inspecting power lines, or mapping remote bushland. The M400 flies up to 59 minutes with typical payloads like the H30T, compared to:

That’s 30–40% more usable airtime per flight compared to the M300/350, and double that of the M600 Pro. You don’t just get longer flights. In operation, you can do fewer takeoffs, fewer swaps, and fewer gaps in your data.
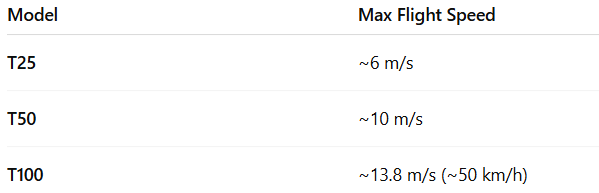
Whether it’s wind resistance or mission timing, the M400 leads:
That’s not just numbers. Faster and more stable flights translate into cleaner mapping grids, quicker job completion, and the ability to fly in more marginal conditions.
Power and Battery Efficiency
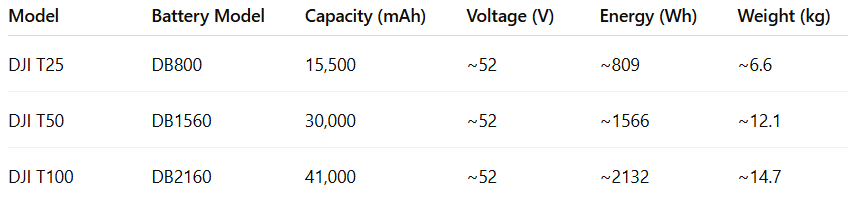
The M400 shifts from the dual-battery TB60/65 system to a single TB100 battery.
Matrice 300/350 dual-battery system (two TB60/65):
TB60 is 5935 mAh, ~52.8 V, ~274 Wh (~200 charge cycles)
TB65 is 5880 mAh, 44.76 V, 263, smaller battery capacity but can handle ~400 charge cycles, double lifespan of TB60.
Redundancy and hot swapping
Matrice 600 6-battery system (6 TB47s):
M400 single large battery (TB100/100c)
T100 is 20,254 mAh, 48 V, ~977 Wh (~400 charge cycles ),
roughly 1.8× the total energy of a pair of TB60s.
That’s why longer flight times. Also rated for ~400 charge cycles
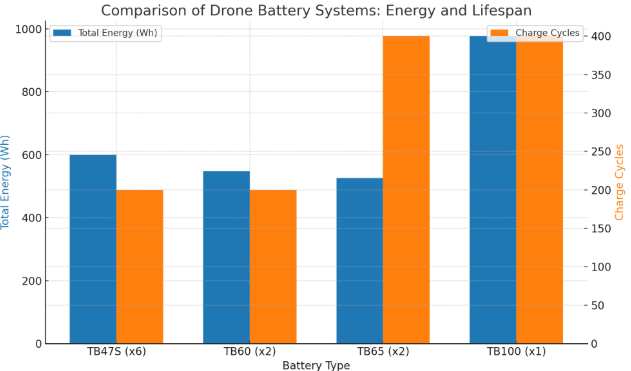
The TB100 is nearly twice the energy of the TB60 pair, and it still manages 400 charge cycles (same as TB65, twice the TB60 lifespan).
TB100 (400 cycles), meaning it has a longer lifespan, twice as long, so the cost is lower over time.
Cost-wise, it’s competitive:
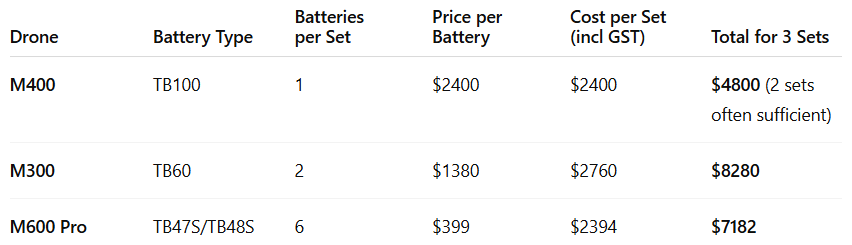
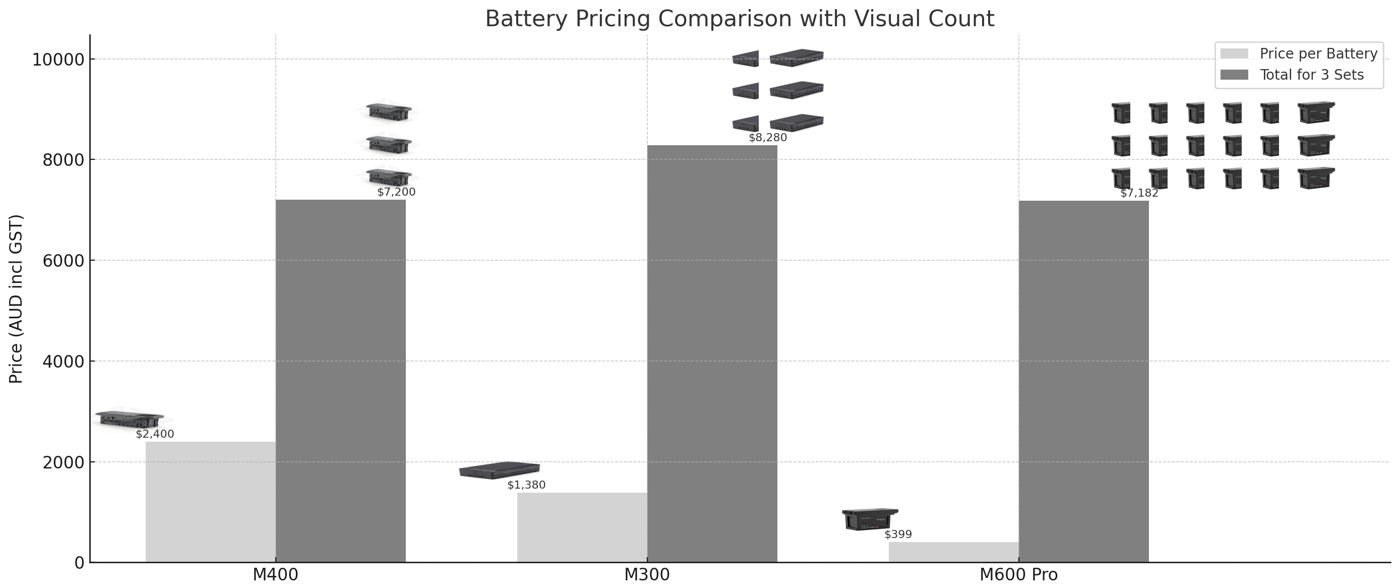
Most pros get 3 battery sets. The M400 could do the same job with 2 sets instead of 3, and still have spare time. With a fast charger (BS100), one TB100 charges in ~45 mins, so a 2-battery cycle could keep you airborne all day.
But still, we do recommend getting 3 for redundancy, then you can have a set cooling down before charging them (better for the battery health).
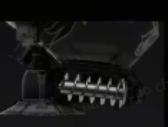
Payloads: Heavier, Smarter, More at Once
The M400 can be a replacement for the M600 as it carries up to 6 kg which is the same as the M600 Pro, but with double the flight time. Compared to the M300/350's which carries 2.7 kg capacity, M300 can still be in your list if you are using a single payload for the mission.
For infrastructure inspections like powerlines or wind turbines, or Search & rescue missions, you usually take a zoom/RGB camera with a thermal sensor/Lidar. In these case, M400 is a good upgrade.
When it comes to surveying and mapping, you might only require the RGB or multispectral camera. In cases you do not require dual payloads or extremely long flights, the M300 is a more compact, field-friendly, and cost-effective solution. I would recommend getting the M400 if you are always doing mapping, getting a lot of jobs, it will save you up to 15-20% time and labour costs. The M400 can finish the job 1-2 flights less than the M300 in a day.
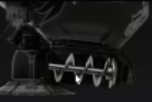
More importantly, it supports multiple payloads at the same time. Up to 7 attachments via 4 E-Port v2 ports. Think:
Previously, you’d need two drones or multiple flights to run thermal and LiDAR simultaneously. Now? One drone, one launch.
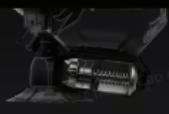
Sensor & Obstacle Avoidance
The M400's obstacle avoidance system combines:
Binocular vision
mmWave radar
Rotating LiDAR
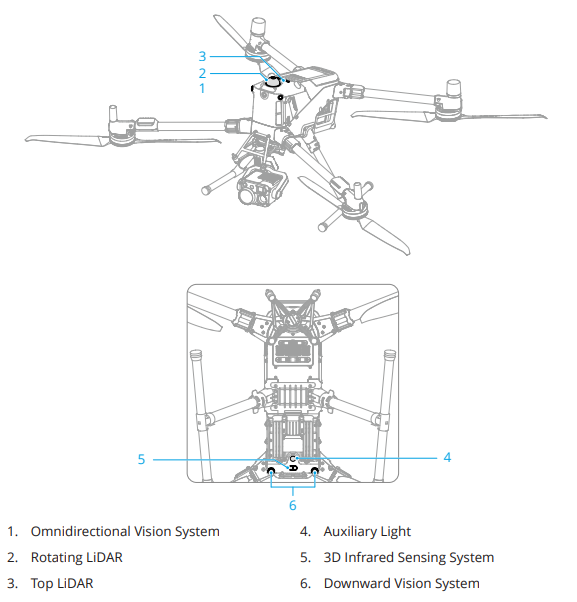
Illustration obtained from DJI M400 User manual.
Unlike older models that rely on vision and infrared alone, this multi-layered detection system excels at spotting thin objects like power lines, even in low light.
Pair it with DJI’s Power Line AR + L2 LiDAR, and you’ve got a drone that can trace live transmission lines safely, quickly, and at speed.
Mapping Efficiency: Cover More, Fly Less
Mapping 1,000 acres (≈4 km²):
That’s up to 1.5 hours saved per project—less labour, less wear and tear, fewer battery sets.
Field Use: Real Ops in SAR, Night, and Harsh Weather
From -20°C to 50°C, rain or dust, the M400 is IP55 rated and mission-ready. Use cases include:
Search & Rescue: Fly longer with TB100C tethered for extended ops
Night Ops: H30T + spotlight (S1) + speaker (V1) combo
Agriculture: Large paddock scan, thermal, NDVI, and RGB in one run
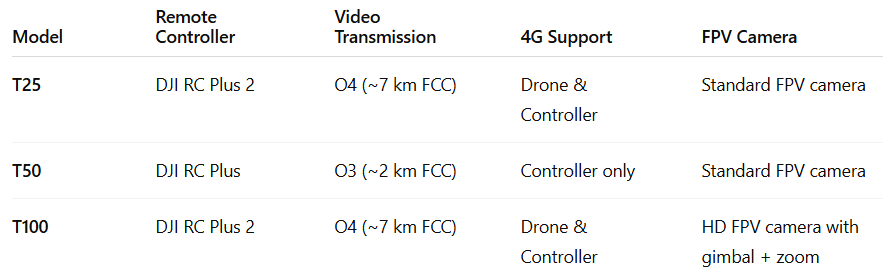
And for those already using the RC Plus controller and DJI Pilot 2 interface—zero learning curve.
Is the M400 Worth the Jump?
If you run complex missions, long-range inspections, or high-output mapping jobs, then yes, 100%.
It offers a balance:
M600 Pro power with M300 endurance
Heavier payload capacity than both
Longer battery life and smarter integration
It helps to reduce costs over time (operational time needed and long-term battery cost).
Give us a call if you need help deciding:
M400: Shop page
M300: Shop page
M600: Shop page